Smalltalk80LanguageImplementation:Chapter 19
- Chapter 19 Pens
Pens
Object

    Magnitude
        Character
        Date
        Time

        Number
            Float
            Fraction
            Integer
                LargeNegativeInteger
                LargePositiveInteger
                SmallInteger

        LookupKey
            Association

    Link

        Process

    Collection

        SequenceableCollection
            LinkedList

                Semaphore

            ArrayedCollection
                Array

                Bitmap
                    DisplayBitmap

                RunArray
                String
                    Symbol
                Text
                ByteArray

            Interval
            OrderedCollection
                SortedCollection
        Bag
        MappedCollection
        Set
            Dictionary
                IdentifyDictionary

    Stream
        PositionableStream
            ReadStream
            WriteStream
                ReadWriteStream
                    ExternalStream
                        FileStream

        Random

    File
    FileDirectory
    FilePage

    UndefinedObject
    Boolean
        False
        True

    ProcessorScheduler
    Delay
    SharedQueue

    Behavior
        ClassDescription
            Class
            MetaClass

    Point
    Rectangle
    BitBit
        CharacterScanner

        Pen***

    DisplayObject
        DisplayMedium
            Form
                Cursor
                DisplayScreen
        InfiniteForm
        OpaqueForm
        Path
            Arc
                Circle
            Curve
            Line
            LinearFit
            Spline
As explained in the previous chapter, Forms represent images. Lines can be created by copying a Form to several locations in another Form at incremental distances between two designated points. Higher-level access to line drawing is provided by instances of class Pen.
Pen is a subclass of BitBlt. As such, it is a holder for source and destination Forms. The source Form can be colored black or white or different tones of gray, and copied into the destination Form with different combination rules, different halftone masks, and with respect to different clipping rectangles. The source Form is the Pen's writing tool or nib. The destination Form is the Pen's writing surface; it is usually the Form representing the display screen.
In addition to the implementations inherited from BitBlt,a Pen has a Point that indicates a position on the display screen and a Number that indicates a direction in which the Pen moves. A Pen understands messages that cause it to change its position or direction. When its position changes, the Pen can leave a copy of its Form at its former position. By moving the Pen to different screen positions and copying its Form to one or more of these positions, graphic designs are created.
Several programming systems provide this kind of access to line drawing. In these systems, the line drawer is typically called a "turtle" after the one first provided in the MIT/BBN Logo language (Seymour Papert, MindStorms: Children, Computers and Powerful Ideas, Basic Books, 1980; Harold Abelson and Andrea diSessa, Turtle Geometry: The Computer as a Medium for Exploring Mathematics, MIT Press, 1981). The protocol for Pens supports messages that are like the turtle commands provided in Logo. These consist of commands for telling the turtle to go some distance, turn some amount, to place a pen in a down position, and to place a pen in an up position. When the pen is down and it moves, a trace of the turtle's path is created. The corresponding Pen messages are go: distance, turn: amount, down, and up.
Multiple Pens can be created and their movement on the screen coordinated so that the process of creating a graphical design can itself be graphically pleasing. The next section contains the protocol that is provided in class Pen. Subsequent sections give examples of designs that can be created by sending messages to Pens.
Class Pen
Instances of class Pen are created by sending Pen the message new. A Pen created this way can draw anywhere on the display screen; its initial position is the center of the screen, facing in a direction towards the top of the screen. The Pen is set to draw (i.e., it is down) with a source Form or nib that is a 1 by 1 black dot.
There are two ways to change the source Form of a Pen. One way is to send the Pen the message defaultNib: widthInteger. The other way is to reset the source Form by sending the Pen the messages it inherits from its superclass, BitBlt. For example, the message sourceForm: changes the source form, or the message mask: changes the halftone form (the mask) used in displaying the source form. (Note that the default mask for displaying is black.)
| initialize-release | |
| defaultNib: shape | A "nib" is the tip of a pen. This is an easy way to set up a default pen. The Form for the receiver is a rectangular shape with height and width equal to (1) the argument, shape, if shape is an Integer; or (2) the coordinates of shape if shape is a Point. |
| Pen instance protocol | |
Thus
bic ← Pen new defaultNib: 2
creates a Pen with a black Form that is 2 bits wide by 2 bits high.
The accessing protocol for a Pen provides access to the Pen's current direction, location, and drawing region. The drawing region is referred to as the Pen's frame.
| accessing | |
| direction | Answer the receiver's current direction. 270 is towards the top of the screen. |
| location | Answer the receiver's current location. |
| frame | Answer the Rectangle in which the receiver can draw. |
| frame: aRectangle | Set the Rectangle in which the receiver can draw to be the argument, aRectangle. |
| Pen instance protocol | |
Continuing to use the example, bic, and assuming that the display screen is 600 bits wide and 800 bits high, we have
| expression | result |
| bic direction | 270 |
| bic location | 300@400 |
| bic frame:(50@50 extent: 200@200) | |
| bic location | 300@400 |
Notice that when the Pen direction is towards the top of the display screen, the angle is 270 degrees. Notice also that the Pen is currently outside its drawing region and would have to be placed within the Rectangle, 50@ 50 corner: 250 @250, before any of its marks could be seen.
The "turtle" drawing commands alter the Pen's drawing state, orient its drawing direction, and reposition it.
| moving | |
| down | Set the state of the receiver to "down" so that it leaves marks when it move. |
| up | Set the state of the receiver to "up" so that it does not leave marks when it moves. |
| turn: degrees | Change the direction that the receiver faces by an amount equal to the argument, degrees. |
| north | Set the receiver's direction to facing toward the top of the display screen. |
| go: distance | Move the receiver in its current direction a number of bits equal to the argument, distance. If the receiver status is "down," a line will be drawn using the receiver's Form as the shape of the drawing brush. |
| goto: aPoint | Move the receiver to position aPoint. If the receiver status is "down", a line will be drawn from the current position to the new one using the receiver's Form as the shape of the drawing brush. The receiver's direction does not change. |
| place: aPoint | Set the receiver at position aPoint. No lines are drawn. |
| home | Place the receiver at the center of the region in which it can draw. |
| Pen instance protocol | |
Thus we can place bic in the center of its frame by evaluating the expression
bic home
If we then ask
bic location
the response would be 150 @150.
Suppose that we drew a line with a Pen and then decided that we wanted to erase it. If the line had been drawn with a black Form, then we can erase it by drawing over it with a white Form of at least the same size. Thus
bic go: 100
draws the black line. Then
bic white
sets the drawing mask to be all white (the message white is inherited from the protocol of BitBlt), and then
bic go: -100
draws over the original line, erasing it.
An exercise that is common in the Logo examples is to create various polygon shapes, such as a square.
4 timesRepeat: [bic go: 100. bic turn: 90]
The following expression creates any polygon shape by computing the angle of turning as a function of the number of sides. If nSides is the number of sides of the desired polygon, then
nSides timesRepeat: [bic go: 100. bic turn: 360 // nSides]
will draw the polygon. We can create a class Polygon whose instances refer to the number of sides and length of each side. In addition, each Polygon has its own Pen for drawing. In the definition that follows, we specify that a Polygon can be told to draw on the display screen; the method is the one described earlier.
| class name | Polygon |
| superclass | Object |
| instance variable names | drawingPen nSides length |
| class methods | instance creation
new
↑super new default
|
| instance methods | drawing
draw
drawingPen black.
nSides timesRepeat: [drawingPen go: length; turn: 360 // nSides]
accessing
length: n
length ← n
sides: n
nSides ← n
private
default
drawingPen ← Pen new.
self length: 100.
self sides: 4
|
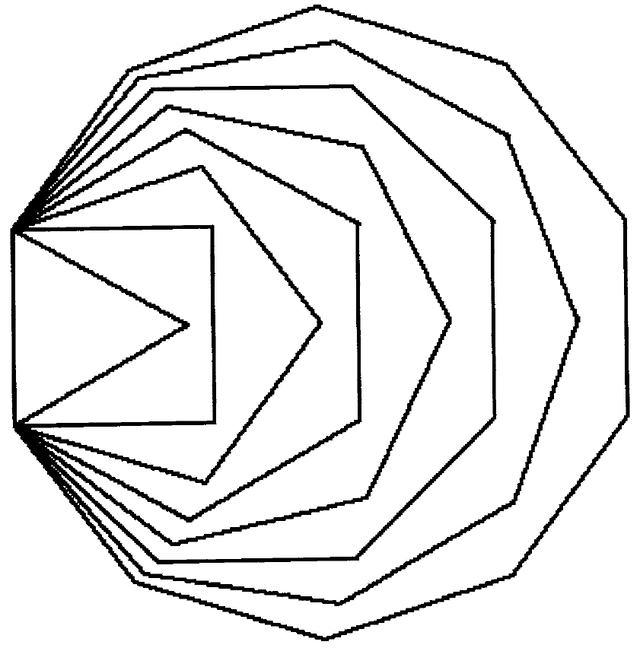
Then a Polygon can be created and a sequence of polygons drawn by evaluating the expressions
poly ← Polygon new.
3 to: 10 do: [ :sides | poly sides: sides. poly draw]
The result is shown in Figure 19.1.
Geometric Designs
The Logo books mentioned earlier provide extensive examples of how to use this kind of access to line drawing in order to create images on a computer display screen. We provide several examples of methods that can be added to a Pen so that any Pen can draw a geometric design such as those shown in Figures 19.2 19.5. (Note: These methods are in the system as part of the description of Pen so that users can play with creating geometric designs.)
Spirals
The first design is called a spiral.A spiral is created by having the Pen draw incrementally longer lines; after each line is drawn, the Pen turns some amount. The lines drawn begin at length 1 and increase by 1 each time until reaching a length equal to the first argument of the message spiral:angle:. The second argument of the message is the amount the Pen turns after drawing each line.
spiral: n angle: a
    1 to: n do:
        [ :i | self go: i. self turn: a]
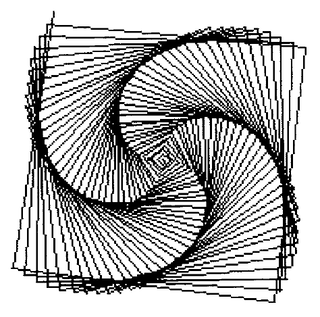
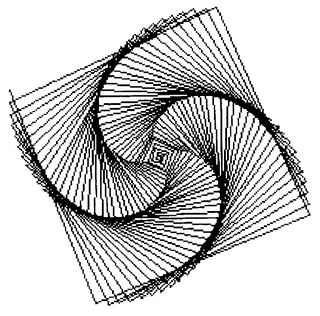
Each of the lines in Figure 19.2 was drawn by sending bic the message spiral:angle:, as follows.
bic spiral: 150 angle: 89
bic spiral: 150 angle: 91
bic spiral: 150 angle: 121
bic home.
bic spiral: 150 angle: 89.
bic home.
bic spiral: 150 angle:91
Dragon Curve
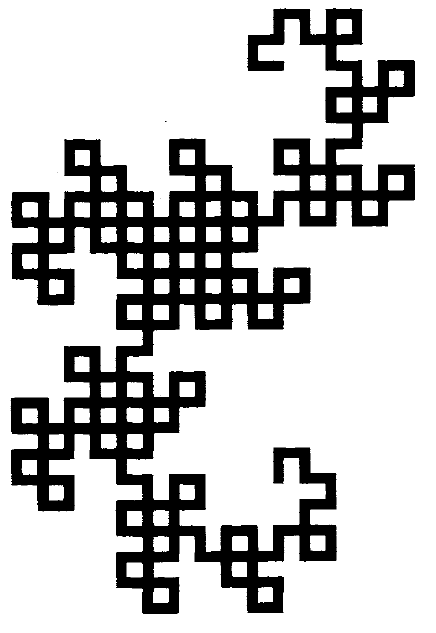
Figure 19.3 is an image of a "dragon curve" of order 8 which was drawn in the middle of the screen by evaluating the expression
bic ← Pen new defaultNib: 4.
bic dragon: 9
The method associated with the message dragon: in class Pen is
dragon: n
    n = 0
        ifTrue: [self go: 10]
        ifFalse:
            [n > 0
                ifTrue:
                    [self dragon: n - 1.
                        self turn: 90.
                        self dragon: 1 - n]
                ifFalse:
                    [self dragon: -1 - n.
                        self turn: -90.
                        self dragon: 1 + n]]
Dragon curves were discussed by Martin Gardner in his mathematical games column in Scientific American (March 1967, p. 124, and April 1967, p. 119). Another discussion of dragon curves appears in Donald Knuth and Chandler Davis, "Number Representations and Dragon Curves," Journal of Recreation Mathematics, Vol. 3, 1970, pp. 66-81 and 133-149.
Hilbert Curve
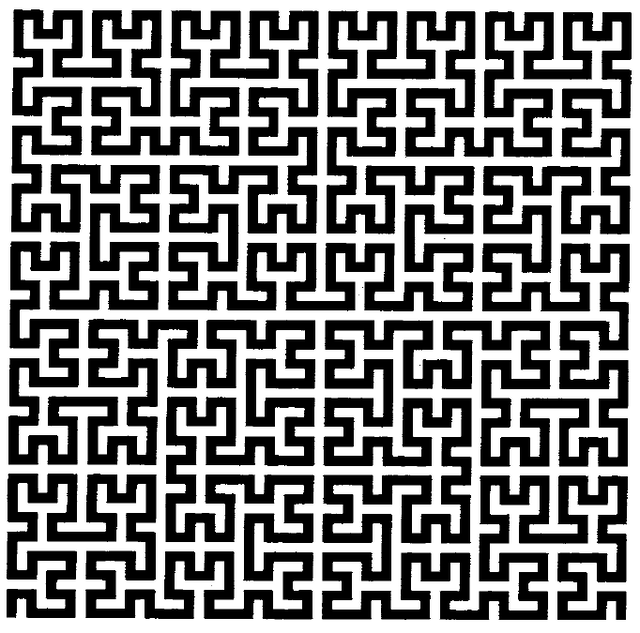
Figure 19.4 is a space-filling curve attributed to the mathematician David Hilbert. A space-filling curve has an index; as the index increases to infinity, the curve tends to cover the points in a plane. The example is the result of evaluating the expression
Pen new hilbert: 5 side: 8
The index for the example is 5; at each point, a line 8 pixels long is drawn. The corresponding method for the message hilbert:side is
hilbert: n side: s
    | a m |
    n = 0 ifTrue: [↑self turn: 180].
    n > 0 ifTrue: [a ← 90.
                    m < - n - 1]
            ifFalse: [a ← -90.
                        m ← n + 1].
self turn: a.
self hilbert: 0 - m side: s.
self turn: a.
self go: s.
self hilbert: m side: s.
self turn: 0 - a.
self go: s.
self turn: 0 - a
self hilbert: m side: s.
self go: s.
self turn: a.
self hilbert: 0 - m side: s.
self turn: a
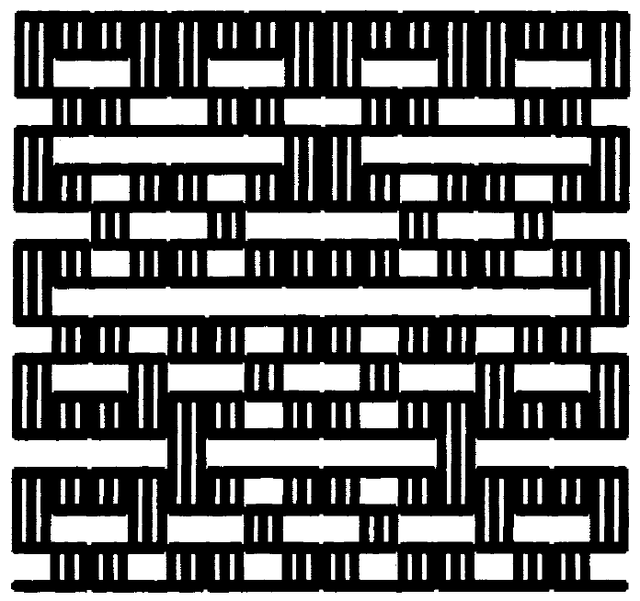
Hilbert curve, where the source form is a different shape, creates a nice effect. Suppose the Form is three dots in a row; this is a system cursor referred to as wait. The image in Figure 19.5 was created by evaluating the expressions
bic ← Pen new sourceForm: Cursor wait.
bic combinationRule: Form under.
bic hilbert: 4 side: 16
Expressions Cursor wait and Form under access a Form and a combination rule, respectively, that are constants in the system and that are known to the named classes. Other such constants are listed in a section of the next chapter. The messages sourceForm: and combinationRule: are inherited by Pens from their superclass BitBlt.
Commander Pen
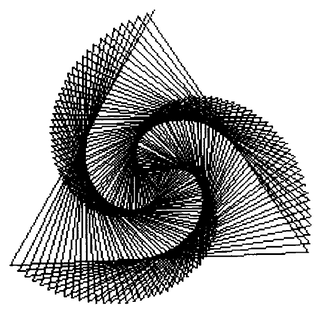
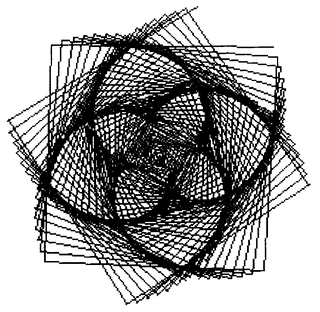
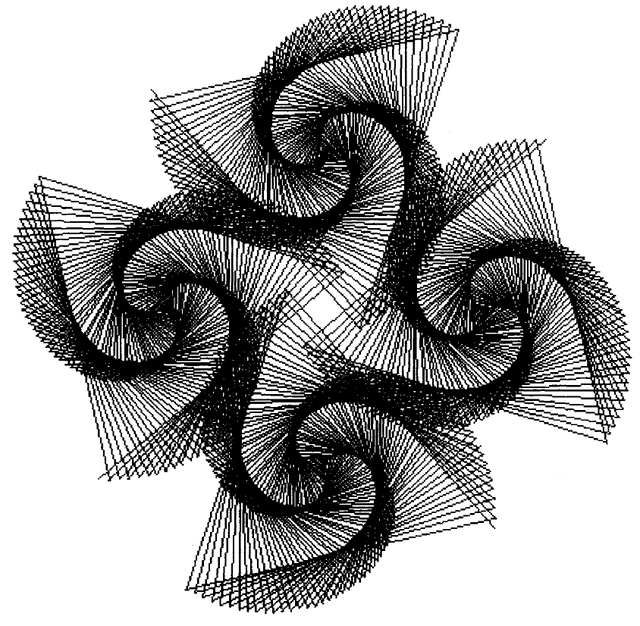
The next example is shown in Figure 19.6. Although we can not show the process by which the design was created, it is a nice example for the reader to try. The basic idea is to create an object that controls several Pens and coordinates their drawing a design. We call the class of this kind of object, Commander. A Commander is an array of Pens. Pens controlled by a Commander can be given directions by having the Commander enumerate each Pen and evaluate a block containing Pen commands. So if a Commander's Pens should each go: 100, for example, then the Commander can be sent the message
do: [ :eachPen | eachPen go: 100]
A Commander also responds to messages to arrange its Pens so that interesting designs based on symmetries can be created. The two messages given in the description of Commander shown next are fanOut and lineUpFrom: startPoint to: endPoint. The first message arranges the Pens so that their angles are evenly distributed around 360 degrees. A Commander's Pens can be positioned evenly along a line using the message lineUpFrom:to:, where the arguments define the end points of the line.
A description for Commander follows. The message new: is redefined so that Pens are stored in each element of the Array.
| class name | Commander |
| superclass | Array |
| class methods | instance creation
new: numberOfPens
| newCommander |
newCommander ← super new: numberOfPens.
1 to: numberOfPens do:
[ :index | newCommander at: index put: Pen new].
↑newCommander
|
| instance methods | distributing
fanOut
1 to: self size do:
[ :index |
(self at: index) turn: (index -1) * (360 / self size)]
lineUpFrom: startPoint to: endPoint
1 to: self size do:
[ :index |
(self at: index)
place: startPoint + (stopPoint - startPoint * (index -1) / (self size - 1))]
|
The methods are useful examples of sending messages to instances of class Point. The image in Figure 19.6 was drawn by evaluating the expressions
bic ← Commander new: 4.
bic fanOut
bic do: [ :eachPen | eachPen up. eachPen go: 100. eachPen down].
bic do: [ : eachPen | eachPen spiral: 200 angle: 121]
The message do: to a Commander is inherited from its Collection superclass.
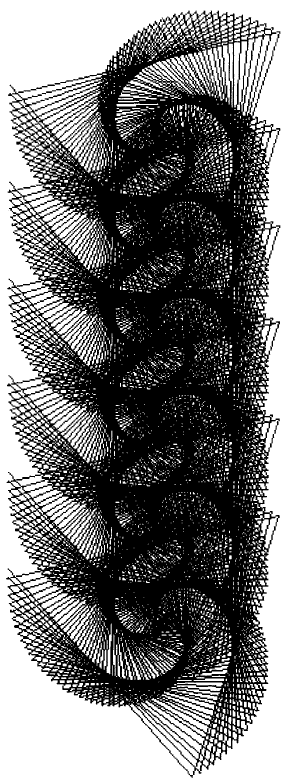
Another example of the use of a Commander is given in Figure 19.7. This image was created by using the message lineUpFrom:to:. It is a simple sequence of spirals arranged along a line at an angle, created by evaluating the expressions
bic ← Commander new: 6.
bic lineUpFrom: (300@150) to: (300@500).
bic do: [ :eachPen | eachPen spiral: 200 angle: 121]
❏ Additional Protocol for Commander Pen
An expanded description of Commander adds to Commander each message of the protocol of class Pen whose behavior changes position or orientation. This additional protocol supports the ability to send messages that are part of Pen's protocol to the Commander. Each such message is implemented as broadcasting the message to the elements of the collection. In this way, messages to Commander take the same form as messages to any Pen, rather than that of a do: message. With the class defined in this way, drawing sequences to a Commander appear more like drawing sequences to a Pen. Moreover, all the Pens commanded by a Commander draw in parallel; for example, all the spirals of Figures 19.6 or 19.7 would grow at once.
down
    self do: [ :each | each down]
up
    self do: [ :each | each up]
turn: degrees
    self do: [ :each | each turn: degrees]
north
    self do: [ :each | each north]
go: distance
    self do: [ :each | each go: distance]
goto: aPoint
    self do: [ :each | each goto: aPoint]
place: aPoint
    self do: [ :each | each place: aPoint]
home
    self do: [ :each | each home]
spiral: n angle: a
    1 to: n do:
        [ :i | self go: i. self turn: a]
With this additional protocol, Figure 19.6 can be drawn by evaluating the expressions
bic ← Commander new: 4.
bic fanOut.
bic up.
bic go: 100.
bic down.
bic spiral: 200 angle: 121
and Figure 19.7 by the expressions
bic ← Commander new: 6.
bic lineUpFrom: (300@150) to: (300@500).
bic spiral: 200 angle: 121
